How to Cross Stitch
Cross stitch is a fun and easy to learn craft that can give you hours of enjoyment, entertainment and pleasure and rewards you with a stunning artwork at the end. Anyone young or old can learn this simple and yet incredible art! Here we will provide a brief introduction and instructions to help you on your way, making specific references to our designs. If you feel your first project may be at risk of mistakes or find the souring of materials and measuring daunting, consider our leading and premium kit offerings which are the perfect place to begin your journey!
What is Cross Stitching?
Cross Stitching is a form of counted thread embroidery. You create a collection of X shaped stitches on fabric which forms a picture. Think of it like when you zoom in really close to a photo and it becomes a bunch of coloured squares. But when you zoom out, you have a beautiful picture! This is what cross-stitch is like, creating lots of coloured X's to create a beautiful picture.
Suggested equipment you will need includes:
- small scissors
- DMC floss
- highlighter (if you plan to work from a printed pattern)
- size 26 John James tapestry needle, one for each DMC color is recommended but less is also OK! (other brands OK)
- 14 count Aida cloth (higher counts are OK but 14 is the easiest to start out with)
- Stitching hoop, scroll frame or Q-snap (explained later)
- Velcro (for if you pick a scroll frame only)
- Floss bobbins, floss spinner, storage box or snack zip lock bags, cardboard phone cards, Tupperware to store your floss
- Project bag
- printed pattern
- needle-minder (magnetic pretty that you attach to your fabric or have by your side to hold needles that are not in use)
Reading Your Chart
After making payment, you will be able to download all your files. The first file you should read is the 'read me first' PDF, which will contain everything you need to know as to what all these file names mean and how to use the one best suited to your needs.
Next you will want to get to your pattern. As you are a beginner, we recommend using the 14-count pattern where available. When you first open this file, go to the FAQ and familiarise yourself with the FAQ and the pattern.
Your chart is your blue-print to creating a beautiful artwork. The grid on your pattern represents the fabric, each square on the pattern represents a square on your fabric. The symbols on your pattern tell you what colour you need to put in the square. Your pattern Key will give you the symbols and their colour matches.
When you start a new project, it is a good idea to start stitching in the middle of the design to make sure it is centred. However, if you are more comfortable, you can simply measure your fabric, find the top left where you should begin stitching, and go row by row from the top left page. This is a very common method used by stitchers who are working on large projects and full coverage projects.
Fabric preparation
There are three common fabric types used in cross stitch. Aida, Evenweave and Linen. Most stitchers will do their first projects on aida, and later try fabrics such as the evenweave or linen. Fabrics are sized using 'counts'. The higher the count number, the smaller the X will be. We recommend for your first projects, that you begin with 14 count (also referred to as 14ct).
Ensure you buy enough fabric to allow for framing. If you are on a full coverage design then you will want to include an additional 20cm L x 20cm W. If you have fabric exposed and this is not a full coverage work, then you may wish to include more than the 20cm of fabric extra to enhance the finished framing effect. To calculate how much fabric you need, simply refer to your front cover and add the extra fabric to it to arrive at what you will need to purchase.
If you haven't got a kit from Unconventional X Stitch, then you will most likely need to prepare your fabric for stitching. As you are working on a woven fabric that has been cut, it will fray over time which can cause precious fabric to waste away and even potentially not leave you with enough to frame with. You can use an overlock machine to overlock the edges or use masking tape folded over the edges of the fabric to seal them. This will prevent the fabric from fraying.
If you are using the centre method to start your stitching from, fold your fabric length ways and create a crease and then width ways to create another crease. Locate where the creases meet in the middle, and this is the centre of your fabric. If you are using the top left, measure from the edge in by 10cm and mark with a pin. Do this in each corner and this will show you your stitch area. You will then count stitch by stitch L x W to ensure you have measured correctly and have the right size of fabric.
Once you have your start point, you can attach your support device. This will be a hoop, a scroll frame, or q-snaps. Ensure you have strong tension, which will give you consistent X's. Loose and flappy fabric can make stitches uneven and result in a lot of stitcher frustration! Never over stretch your fabric, as this will cause your fabric to warp and can ruin a project. When using a hoops or Q-snap that can squash your stitches, it is recommended to remove the hoops or q-snap when not working on the project, to reduce the amount of squash and damage to stitches.
Floss
The thread used goes by many names. The most common is floss or just threads. Whilst there is a myriad of brands available, Unconventional X Stitch works exclusively with the DMC brand, which is the world leading for best quality and consistency in colouration. You will notice that each skein of floss can be split into 6 strands. As you are working on 14 count, you will need to cut an approximately 45 - 50cm length of floss. If you go longer than this, you increase your risk of knots and twisting of the thread during stitching. You will then split two strands off for use. All Unconventional X Stitch designs are calculated off 2 strands unless the PDF file name says otherwise.
Needle
Depending on your budget, you may have 1 needle or many needles available to start you off. We recommend as many needles as the budget will allow, if you have an Unconventional X Stitch kit, you will have been provided with 6 premium JJ needles. Thread the needle as if you were hand-sewing and do not make any knots in the tail.
Time to Stitch!
Cross-stitching is traditionally done by stitching colours row by row, but many modern designs have confetti (where there are single stitches or just a few stitches spread all over the design that would look like confetti). This has changed how some people stitch, inventing styles such as the Extreme Cross Country which is one of our favourite methods over at Unconventional X Stitch. Extreme Cross Country is where you make long jumps across your fabric from behind to chase the next confetti stitch. This will use more thread, and also create a 'messy' back. If you would like to reduce floss wastage, keep it traditional and have a neat back, only ever move a few stitches away from the last you did. If it is more than a few stitches away, tie off and start over in the new area.
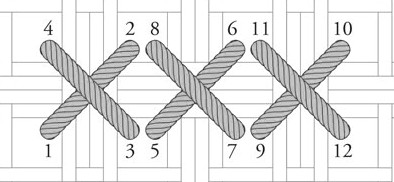
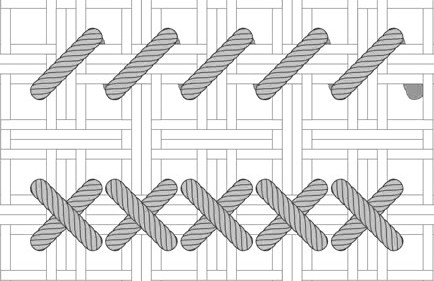
You will notice that your aida fabric looks like a collection of woven squares. You will create your X using the holes in the fabrics. See the below images on how to form the stitches. With your needle held behind the fabric, come up through hole labelled 1 and ensure there is enough of a thread-tail hanging out the back in order to secure it, and go down the hole labelled 2. Repeat this for holes 3 and 4. You have now made your first ever X! Pull your tail to the right gently, as you will stitch your next X's over this tail in order to anchor it and prevent your stitches from undoing. Continue on and practice making those X's! When ready to cut, using your needle, slide gently from the back under your X's and cut. This will anchor your end tail and prevent your stitches from unravelling.

(figure 1 - creating X's)

(figure 2 - creating rows of X's)
You may find that as you stitch, that your thread begins to twist and wind up, you can fix this by carefully letting the needle go and it will spin and untangle itself. It is vital that you do this, otherwise your X's will become twisted and warped.
And that's it! It is that easy!
 USD
USD


